Poultry and uneven geometry
The roast chicken looks finished. Its breast is golden, the kitchen smells promising, and the timer has rung. You place a thermometer into the breast and get a satisfactory reading. Then you check an inner thigh and find a lower temperature. The bird has not contradicted the thermometer. You have discovered that one attractive object contains several different heating problems.
A whole chicken joins thick and thin regions, bones, skin, exposed surfaces, and sheltered areas. A package of chicken pieces simplifies some of that geometry but introduces another possibility: each piece can finish at a different time. Even a single boneless breast usually changes thickness from one end to the other.
This chapter asks you to choose a manageable form of poultry and map its cooking requirements. The objective is not to memorize a universal chicken time. It is to know what you bought, what the method assumes, where to measure, and what to do when the measurements disagree.
Breast, thigh, and whole bird are different purchases
A breast portion gives you one set of muscles in a relatively accessible form. A thigh gives you another, with its own shape and, depending on the purchase, bone and skin. A whole bird keeps these regions attached. Those differences affect preparation, serving, and the freedom to remove one finished part while another continues cooking.
The distinction between white and dark meat has a biological basis. USDA explains that poultry muscle color is associated with myoglobin, an oxygen-storing protein within muscle cells. The culinary lesson is not that darker color means undercooked. The starting tissues differ before you begin heating them.
A thigh's eating texture and a breast's eating texture need not become identical at the same measured endpoint. The safety requirement establishes a condition that must be met; it does not promise that every cut will feel the same when chewed. A recipe may continue cooking a particular cut for a preferred texture after the minimum has been reached. Keep that quality decision distinct from evidence of safe completion.
Choose the form that fits your task. For one or two portions, a published breast preparation may demand less carving and leftover planning than a whole bird. For several meals with different uses for the meat, a whole bird can be useful if you have the equipment, time, and storage capacity. Neither purchase demonstrates greater seriousness as a cook by itself.
Name the dimensions that the method depends on
The label chicken breast can conceal a thin cutlet, a large rounded boneless portion, or a bone-in piece with skin. Substituting among them changes the work. Before following a recipe, look for its stated thickness, bone status, skin status, and number of pieces. If the description does not match your purchase, find a method that does.
Thickness matters because heat must travel into the interior. A thin edge can finish while a rounded center still needs cooking. The relevant question is therefore not merely how much the package weighs, but how that weight is distributed. Two portions with the same weight can demand different attention if one is broad and thin while the other is compact and thick.
Some preparations intentionally alter shape by cutting or flattening. Treat those as actual preparation steps, with their own safe handling and technique requirements. Do not improvise a forceful pounding operation simply because a method seems slow. A novice can instead buy the form a recipe specifies and concentrate on cooking it well.
A whole bird adds another dimension: the relation among its parts. The breast does not experience exactly the same surrounding conditions as the inner thigh. The cavity and the way the bird sits in the pan influence which surfaces are exposed. A cooking time based on total weight is useful for scheduling, but it cannot tell you the temperature at every relevant location.
One breast, two stages of heating
Food Hero's Skillet-Braised Chicken is a practical starting point. It specifies a breast about one inch thick, an initial browning stage, covered low heat, and a covered off-heat stage before measurement. The recipe requires at least 165°F internally and explicitly instructs further cooking and rechecking if that endpoint has not been reached. Follow the complete source procedure.
This method is particularly useful for understanding what a recipe does with stored heat. Switching the burner off is part of its planned sequence. It is not the declaration that the chicken is finished. The later measurement decides whether the sequence achieved the required internal result in your actual food and equipment.
The tight-fitting lid is also an active part of the arrangement. Removing it repeatedly changes conditions during stages written for a covered vessel. The source's instructions to leave it in place therefore have a purpose. Follow the sequence, then perform the required check. Curiosity is valuable, but an experiment that changes the method should be recognized as a changed method.
The recipe's title does not mean that every braise lasts for hours. Here the cut and intended result differ from the collagen-rich beef braise developed in Chapter 6. A cooking-method label names a family of arrangements; it does not supply the correct duration for every ingredient placed within that family.
What scaling the skillet actually changes
Suppose you want four portions and the source describes one breast. Doubling or quadrupling the ingredient does not necessarily preserve the depth, contact, or lid fit in your skillet. Several pieces may crowd one another or require a different vessel. That changes the setup before you have altered any timer.
For a first attempt, keep the published quantity and equipment arrangement. If you need a larger meal, select a complete recipe designed for that quantity or plan separate batches with safe serving and storage. The simplest successful scale is often the one you can actually inspect and measure comfortably.
Imagine two pieces in a pan, one notably thicker than the other. They may share the burner setting but not the same internal progress. Write separate entries in your cooking notes rather than recording one temperature for the pan. If both are intended to be served, both need appropriate checks.
This is also why a statement such as chicken took twenty minutes is incomplete evidence for another cook. The record becomes useful when it identifies the cut, thickness, starting condition, equipment, sequence, and measurement. You do not need laboratory precision in every kitchen note. You do need enough information to distinguish a method that transfers from a coincidence that may not.
A whole bird is an optional larger exercise
Food Hero's Roasted Whole Chicken specifies a four-to-six-pound bird, an uncovered roast, internal measurement, and a rest before cutting. It also includes preparation instructions such as removing material from the cavity and not rinsing the chicken. Use the complete roast procedure; its separate stock-making notes are not required for this chapter.
Read the source's time as an inspection schedule within a method that still requires measurement. A smaller or larger bird can take a different amount of time, as the recipe itself notes. The oven setting is the surrounding condition you selected, while the internal readings describe what has happened in the bird.
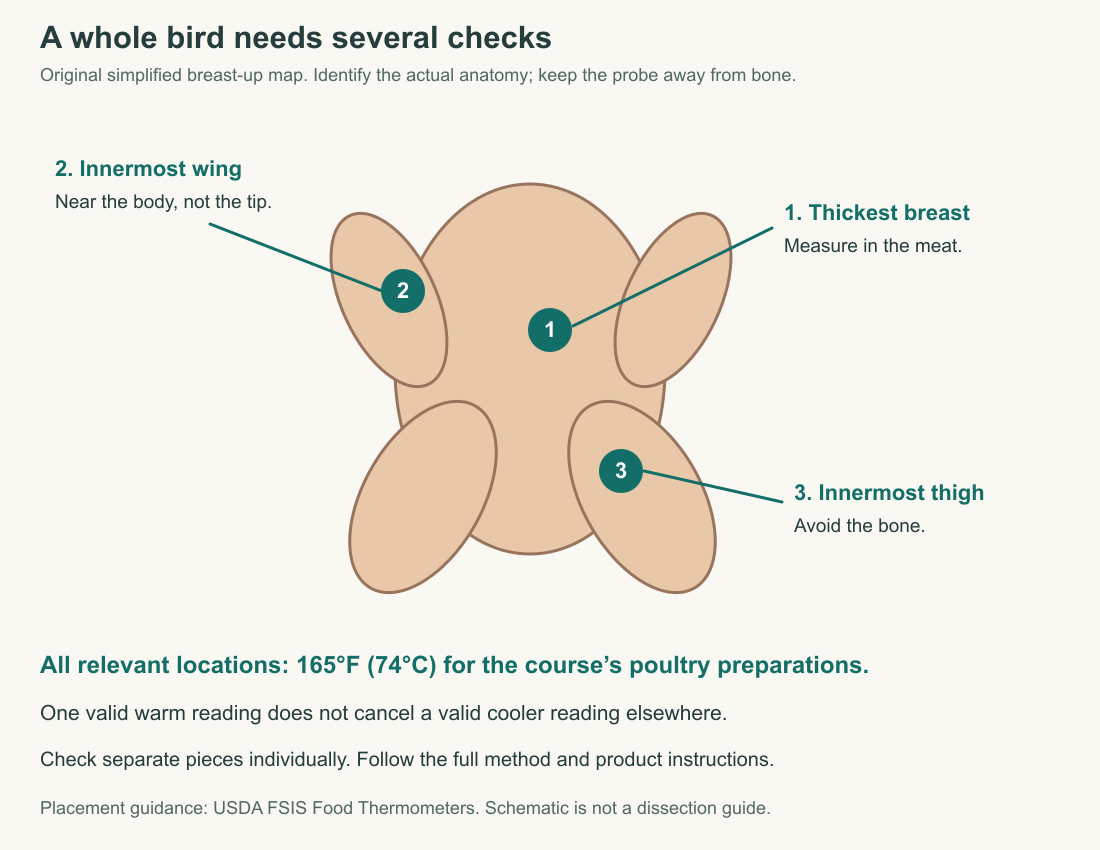
For this course's whole-bird check, use USDA's full set of locations: the thickest breast, innermost thigh, and innermost wing, avoiding bone. The recipe mentions breast and thigh; the official measurement guidance adds the wing. Each required location must reach the poultry endpoint rather than relying on a single convenient reading.
Keep the cavity unstuffed for this exercise. Stuffing creates an additional food mass with its own heating and measurement requirements. It is not an interchangeable decoration. Leaving it out lets you learn the bird's geometry without adding another preparation whose center must also complete safe cooking.
Draw a measurement map
Before handling raw poultry, sketch the food on paper. A simple outline is enough. On a boneless breast, mark the thick central region and the thin taper. On a whole bird, mark breast, inner thigh, and inner wing. Then draw an approach for the thermometer that keeps its sensing region in meat rather than against bone or through an empty cavity.
USDA's thermometer guidance calls for these locations and explains sideways insertion for thin pieces. Follow the instrument manufacturer's insertion and response instructions. Some probes sense near the tip; others require a longer length inside the food. Knowing the display number is not enough if you do not know what part of the instrument produced it.
The map makes a hidden assumption visible. If your arrow stops at the surface, you have planned a surface check. If it passes through the cavity, you may be measuring an environment rather than the desired tissue. If it ends against bone, reposition it before treating the reading as representative of the meat.
Real pieces will not perfectly match your drawing. Use it to prepare your attention, then adjust to the actual anatomy and dimensions. Safely support the food and use heat protection as needed while measuring. A rushed reach across a hot pan is not a necessary part of good technique.
Disagreement is information
Use this hypothetical record for a whole bird: breast 168°F, inner thigh 159°F, inner wing 164°F, with all three readings assumed correctly placed and stable. The breast reading is satisfactory. The other two are not. The bird needs further appropriate cooking and rechecking before service.
The arithmetic average is irrelevant to that decision. An average can describe a set of numbers while concealing a location that has not reached its requirement. The task is to establish completion in the relevant regions, not to make a summary statistic exceed the threshold.
Do not solve the disagreement by moving the probe until you find another warm number and forgetting the cooler location. First verify placement and instrument use. If the lower reading is valid, retain it as evidence that the job remains unfinished. Recheck the region after further cooking.
For a later attempt, the difference can guide a change in method selection. Separately cooked parts provide more freedom to finish them individually. A complete published whole-bird method may also manage exposure differently. Choose a documented approach instead of combining several internet fixes during the final minutes of an already complicated roast.
Color has a narrower job
Browned skin tells you about the surface. White-looking breast meat tells you about appearance where it was cut. Neither alone establishes the internal condition of every relevant region. USDA's Chicken from Farm to Table explains that cooked color can vary and that safety must be assessed with a food thermometer.
This matters in both directions. Pinkness can prompt a useful check, but it does not independently prove unsafe cooking. A pale interior can reassure a cook even when their measurement is missing or inadequate. Replace both shortcuts with the same question: what do appropriately placed readings show?
Juices have a similar limitation. A visual description of liquid is not a substitute for internal measurement. If someone tells you to cook until the juices look right, ask where the required thermometer check belongs in the complete procedure. You can still note appearance afterward as part of the culinary result.
Once the endpoint is established, texture becomes a separate evaluation. Was the breast pleasant to slice and eat? Did the thigh have the desired tenderness? Did the skin retain the intended surface through resting and service? These questions help improve quality without weakening the evidence needed to establish completion.
Separate the raw stage from service
A whole bird requires more handling than a portion already prepared to the recipe's shape. That handling can involve packaging, a cavity, a board, utensils, and a roasting vessel. Arrange the workspace before opening the package so you are not searching through drawers with contaminated hands.
CDC's chicken guidance says raw chicken does not need washing and emphasizes keeping it and its juices away from ready-to-eat food. Use separate clean serving equipment and clean surfaces after raw preparation. A plate that held raw poultry is not ready for the cooked bird simply because it looks empty.
Resting and carving belong in the schedule too. The source's rest occurs after its safe endpoint has been established. Have a suitable clean place for that stage and tools for portioning. If serving only some of the meat, plan the rest for prompt refrigeration rather than letting a large warm remainder sit through the evening.
The complete meal may require vegetables, rice, or sauce, but this exercise need not become a test of coordinating an elaborate dinner. Choose simple accompaniments you can finish without losing track of the poultry. C6 will develop broader meal timing; here the priority is a reliable sequence for one principal ingredient.
Decide whether the whole bird earns its place
A whole chicken's purchase weight includes bones and other material that will not become the same amount of served meat. Boneless portions require less separation. Comparing price per package without considering the portions you will actually use can make the apparent bargain misleading.
Use a practical question: what meals will this purchase serve in my kitchen? If you enjoy carving and have a plan for safely stored leftovers, a whole bird may fit well. If you need two quick portions and will struggle to use the remainder, a smaller purchase may better match the task even when its unit price looks higher.
Equipment matters as well. A vessel that fits the bird, reliable heat protection, a suitable thermometer, and a stable carving setup are part of the work. You need not buy specialized equipment just to demonstrate that you can follow a whole-bird recipe. The single-breast exercise and supplied whole-bird case can teach the central distinction within a smaller kitchen.
Before your next attempt, state one decision that follows from the result. You might choose similar-sized portions, improve probe placement, reserve a clean carving board, or use a complete method for a different cut. The improvement should answer something observed. That is how a familiar ingredient becomes a source of growing competence rather than a repeated gamble on the timer.
Application
Measurement plan: draw either a breast portion or a whole unstuffed chicken. Mark the relevant measurement locations and the thermometer's intended sensing area. State why a reading against bone, in the cavity, or only at the surface would not answer the required question.
Optional cooking: follow one of the complete Food Hero preparations linked above, using the specified cut and equipment. Record thickness or whole-bird weight, heating stages, valid internal readings, any required additional cooking, rest, and texture. Use 165°F (74°C) as the poultry endpoint. Do not serve unfinished poultry while waiting for an assumed temperature rise.
Supplied alternative: a cook buys a large bone-in breast but follows a hypothetical method explicitly specifying one boneless breast about an inch thick. After the recipe's elapsed time, the cook sees browned skin and stops without measuring. Identify the changed assumptions and write a better plan.
Model interpretation: bone status, dimensions, and skin differ from the described ingredient; time and appearance cannot establish completion. Choose a complete method matching the purchased cut, plan correctly placed internal measurements, and continue cooking as required until the applicable endpoint is reached. A successful plan accounts for the actual piece instead of treating its name as a standardized shape.