A first yeast bread
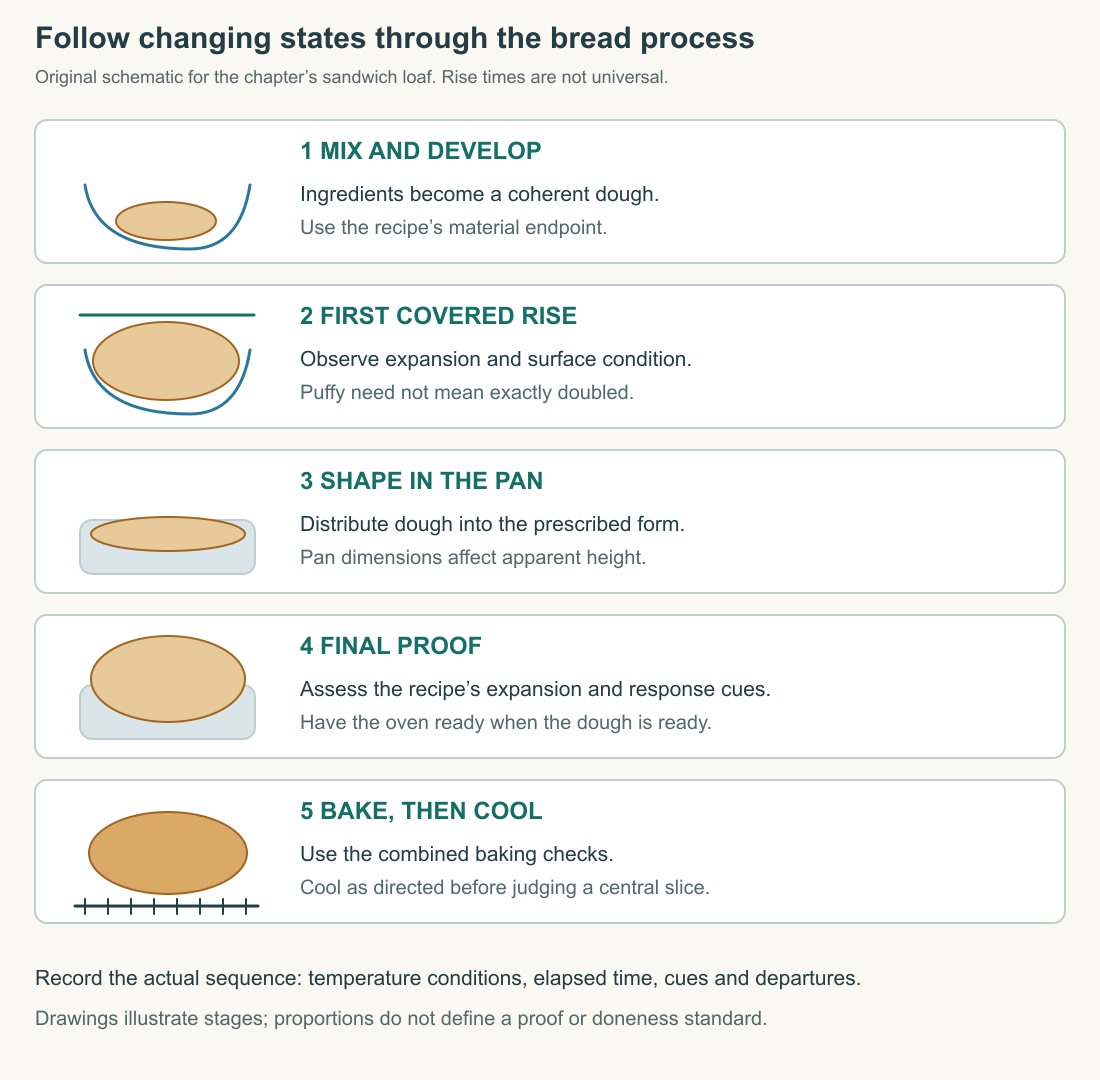
The first loaf is an opportunity to watch one material change through several states. A rough mixture becomes a workable dough; a resting mass becomes puffy; shaping redistributes it; a second rise prepares it for the oven. Baking then gives it a structure that can be cooled and sliced. If you record those transitions, even an imperfect loaf can tell you considerably more than whether you are good at bread.
Our baseline is King Arthur Test Kitchen's Our Favorite Sandwich Bread, a published recipe designed for an eight-and-a-half by four-and-a-half-inch loaf pan. We will use its complete method and interpret the important decisions. This course has not independently baked or tested the formula. The practical exercise relies on the publisher's preparation, while the explanations and notebook comparisons here are original teaching work.
Keep the baseline recipe beside you
The published formula uses the following main ingredients for one loaf. Use its all-purpose flour specification and stated yeast options; branded products are not a requirement to understand the method. If changing the flour, treat that as a variation requiring suitable guidance rather than an invisible substitution.
| Ingredient | Published quantity |
|---|---|
| Milk | 227 g |
| Butter | 28 g |
| Instant or active dry yeast | 2 teaspoons |
| Granulated sugar | 25 g |
| Table salt | 8 g |
| All-purpose flour | 360 g |
The recipe heats milk, melts butter into it and cools the mixture before yeast is added. It develops a soft dough, allows a covered first rise until puffy, shapes an eight-inch log, and proofs it in the specified pan until domed about an inch above the rim. Baking is at 350°F for roughly thirty to thirty-five minutes, with a recipe-specific center cue of 190°F and cooling before slicing. Keep the full published instructions open for the complete preparation and cues.
This compact overview is a map of the process. The following sections explain how to read it, which observations to preserve and what common changes would mean. Optional whole-grain and tangzhong variations on the source page are not part of the first baseline attempt. Completing one coherent process will teach you more than combining several appealing modifications before you know how the original behaves.
Prepare a sequence, not just a shopping list
Read the method through before heating the milk. Confirm the pan, the scale's units, the yeast type and the available time for rising, baking and cooling. Measure the ingredients and identify where each enters. This reduces the chance that a missing addition will be discovered after the dough has begun to develop.
The schedule contains both active work and waits, but a wait does not mean the dough is paused indefinitely. Fermentation continues according to the conditions. Choose a period when you can observe the relevant transitions and preheat the oven in time. If your available window is too short, choose another day or a tested schedule designed for delayed baking rather than inventing a long interruption.
Keep a clean working area and the necessary utensils close enough that handling does not become a scramble. The pan must be prepared as directed before shaped dough needs it. A rack should be ready for the finished loaf. Small logistical details matter because they prevent the process from changing simply while you search for equipment.
Record the room condition if you can measure it, and otherwise describe it honestly. “Room thermometer read 70°F” is a measurement. “The kitchen felt cool” is an observation with less precision. Both are more useful than inventing an exact number afterward. The same principle applies to times: note what actually happened rather than copying the recipe's estimate into the record.
Temperature matters before fermentation begins
The milk-and-butter stage must be followed by cooling appropriate to the recipe and yeast. Hot liquid can damage yeast, while a cool mixture can proceed more slowly. Do not infer that a visibly melted butter mixture is automatically ready for the next addition. The temperature condition and the appearance answer different questions.
Use the recipe and yeast package directions together, retaining the actual product type. Instant and active dry options may enter a method differently when the developer allows them. Follow the specified route for the product you have rather than mixing fragments of two instructions. There is no benefit in proving loyalty to a ritual that the chosen method does not require.
A thermometer can help you observe temperature, but it should be clean and used appropriately. It does not replace the complete instruction or turn one number into a universal rule for every yeast product. If a liquid is too hot for the prescribed stage, allow it to cool; do not compensate by adding an unmeasured amount of cold water that changes the formula.
This is a useful example of preserving variables. Cooling changes the temperature while retaining the measured ingredients. Adding water changes both temperature and composition. Sometimes a recipe intentionally uses a calculated liquid-temperature adjustment, but our first attempt does not need that additional problem. Keep the correction connected to the condition you are trying to change.
Develop the dough the recipe actually describes
At first, the mixture can look uneven. Distribution and hydration must occur before its later feel becomes informative. Scrape and combine the material so that dry pockets do not remain concealed. A rough initial appearance is not sufficient evidence that the water or flour amount is wrong.
As you work the dough, observe cohesion, smoothness and its response to stretching. The target comes from the selected recipe, not from a video of a very wet artisan dough made with different flour. A sandwich dough can be relatively easy to handle while still needing development. Conversely, making it dry enough never to adhere to anything can take it away from the intended composition.
Use the specified lightly greased handling method rather than repeatedly dusting in flour by habit. If a small adjustment is needed under the recipe's guidance, record it. The arithmetic from chapter two showed how added flour can materially reduce hydration. A handful that disappears into the dough is still an ingredient change.
Time is an aid, not the only observation. A machine's action differs from hand kneading, and equipment varies in capacity and approved use. Follow the machine's instructions if using one, and do not assume a longer or faster setting must improve the dough. The meaningful endpoint is the appropriate material condition reached through a suitable process.
The first rise develops a changed mass
During the first covered rise, yeast activity and dough behavior interact. Gas production can expand the mass as the dough retains it. A cover limits surface drying, while the container provides a place to observe change. Its shape matters to your visual estimate: a bowl that widens toward the top makes height a poor direct measure of volume.
For that reason, “it rose two inches” does not have the same meaning in every bowl. A marked, straight-sided container can make relative expansion easier to follow, but the recipe's actual cue remains the reference. Do not impose doubling as a universal requirement when a particular preparation calls for a different condition.
The first rise is also an opportunity to test your initial expectation against evidence. If the dough is progressing more slowly in a cool kitchen, a clock discrepancy alone does not establish failure. If little changes despite suitable conditions, check the ingredient record and yeast before deciding which explanation fits. Avoid adding fresh yeast to a partly developed dough as an automatic response to impatience.
Surface condition can provide another clue. A dried skin indicates that the cover or environment differed from the intended arrangement. That skin can affect later handling, but it does not tell you that the entire dough is irrecoverable. Record the problem, follow appropriate recipe guidance and improve the covering on the next attempt. The notebook should preserve both the result and the conditions that produced it.
Shaping redistributes an already living structure
Shaping is not merely placing a blob in a pan. It organizes the dough into a form that can expand in the intended way. Handling changes the gas distribution and the relationship between the dough's surface and interior. For a sandwich loaf, the goal is a reasonably even form whose dimensions fit the pan, not an imitation of every artisan shaping technique.
Use the selected recipe's log shape and handling guidance. Work deliberately rather than tearing the dough to force it into place. If it resists a movement, distinguish resistance from dryness before adding ingredients. The elasticity and extensibility concepts from chapter two help you describe what is happening instead of treating every difficult movement as a need for more flour.
A poorly distributed shape can produce an uneven loaf even if fermentation is adequate. One thick end and one thin end enter the final rise with different geometry. A large trapped pocket can appear later as a cavity unrelated to the average crumb. These are reasons to observe the shaped dough, not proof that every uneven hole has one shaping cause.
The pan supports and constrains the expansion. Using a wider pan changes the relationship between dough volume and height, as chapter one demonstrated. If your loaf is lower than the reference, compare the pan dimensions before changing yeast or kneading. Geometry is often easier to verify than a speculative account of invisible biological failure.
The final proof prepares the loaf for baking
The final proof follows shaping. It is a new stage, not a requirement to repeat every feature of the first rise. The dough begins from a changed shape and gas distribution. Its readiness must be assessed in relation to the pan and the intended bake, using the cues supplied by the recipe.
An indentation test can contribute information when used as the recipe describes, but it is not a universal instrument independent of dough type and condition. A very cold dough, a different hydration or a dry surface can alter the response. Pair the specified response with the loaf's expansion and the rest of the record rather than turning one poke into an infallible verdict.
Preheat the oven before the dough is ready to enter it. Otherwise, a well-timed proof can be extended unexpectedly while the oven warms. A loaf does not stop changing because the next piece of equipment is unavailable. Preparing the heating environment is therefore part of fermentation timing.
If the final proof goes farther than intended, record that observation and consult the recipe developer's relevant guidance. Do not assume that every overexpanded dough can be corrected by the same treatment. The more useful learning outcome is to identify the point at which your schedule and the dough's progress diverged, then improve that coordination next time.
Baking changes what must support the loaf
In the oven, expanding gases and water vapor act while the dough's structure changes with heat. The crust and interior do not reach the same conditions at the same instant. The loaf must develop enough internal support to retain its form after baking and cooling, which is why a pleasant crust color cannot settle every question.
Use the recipe's combined readiness cues. Its center-temperature reference applies to this preparation; it is not a universal endpoint for every bread, cake or pastry. Place the thermometer so that it measures the relevant interior rather than the pan or a shallow surface zone. Clean equipment and careful handling remain part of the process.
If the exterior colors faster than expected, investigate the recipe's permitted response and your oven arrangement rather than immediately removing an underdeveloped center. If the loaf takes longer, consider the actual oven behavior, size and starting condition. The stated baking range helps you plan checks, but the result must still meet the intended condition.
Take care around the hot pan and escaping heat. Use dry, suitable oven protection and a stable place to set the loaf. The final minutes are not a reason to rush or improvise an unsafe handling method. A good preparation includes getting the finished product onto its cooling arrangement without injury or damage.
Cooling is part of the loaf's development
The loaf continues changing after it leaves the oven. Heat and moisture redistribute, and the structure becomes more suitable for slicing. Cutting too soon can produce a misleading impression of the crumb or damage it mechanically. Follow the cooling instruction before judging whether the interior has the texture you intended.
Use a rack so the loaf can release heat rather than trapping moisture against an unsuitable surface. Do not immediately wrap a hot loaf as though it were ready for storage. Once cooled, follow the published storage guidance and the food-handling principles from Kitchen Foundations. Storage conditions can alter texture, so record when you make the comparison.
Examine a central slice and an end slice as different observations. The crust-to-crumb relationship and heating history differ across the loaf. Record whether the crumb is even, resilient, crumbly, compressed or marked by an isolated cavity. Those words provide more useful evidence than declaring it simply dense or perfect.
Turn the loaf into a controlled next attempt
Suppose your notebook shows correct ingredient amounts and pan dimensions, but the dough entered the oven before reaching the recipe's final-proof cue. A sensible next test is to improve proof timing while preserving the formula. Changing flour, yeast and oven temperature together would obscure whether that timing was the important difference.
Alternatively, suppose the rise observations match the intended sequence but the pan is wider than specified. Correcting the pan addresses a known geometric change. If the cooled crumb is satisfactory but slices are shorter, you may decide the different shape is acceptable. A diagnosis should distinguish a departure from the reference from a result that actually fails your purpose.
The first loaf has now provided a full chain of evidence: ingredients, development, expansion, shaping, proof, bake and cooling. Your next improvement should connect to that chain. The skill you are building is the ability to repeat a successful process and change an unsuccessful one for a reason you can explain.
Application
Make the published baseline loaf when you have a suitable uninterrupted observation window, or construct a preparation plan if practice is not possible. Record the actual ingredient amounts, pan, yeast type, rise cues, baking checks and cooling interval. Photograph the shaped dough and a cooled central slice. Propose one next adjustment tied to an observed departure, keeping unrelated variables fixed.
Check your understanding: A loaf is shorter than the reference photograph. Does this establish that the yeast failed, and does the source's center-temperature cue apply unchanged to every baked product?
Expected answer: No. Pan dimensions, dough amount, shaping, proof and baking can all affect height; inspect the recorded sequence before choosing a cause. The temperature cue belongs to this recipe and should be used with its other readiness observations. Different products and formulas require their own validated method and endpoints.