Measuring doneness and resting
Three people report the same number from a piece of meat. One read the thermometer while its tip touched the pan. Another inserted a suitable probe correctly but removed it before the display settled. The third waited for a stable reading with the sensing region in the intended internal location. Their numbers look equally precise in a notebook. Their evidence is not equally good.
Owning an instrument does not remove the need for judgment. It changes the questions you must ask: what does this instrument sense, where is it sensing, has it responded, and what decision does the reading support? The earlier chapters introduced those questions for particular foods. Here you will assemble them into a repeatable measurement practice.
The chapter also distinguishes a required rest from an assumed temperature rise. A clock is useful for establishing an interval. It cannot establish the temperature reached during that interval unless appropriate measurements support the claim. Used together, the thermometer, clock, recipe, and your observations have complementary jobs.
Define the question before taking the reading
Begin with the food category and the complete preparation. You cannot decide whether a number is satisfactory until you know which requirement applies. A steak, ground meat, fish fillet, egg dish, and poultry portion do not share one interchangeable endpoint. Processing and package instructions can add relevant conditions.
The FoodSafety.gov chart is the reference for this course's ordinary home-cooking endpoints in the United States. It distinguishes temperature requirements, applicable rests, whole eggs, and different dishes. Consult the actual category instead of remembering only the largest number you saw on the page.
For example, the chart gives listed whole-cut beef and pork preparations 145°F plus a three-minute rest, ground beef and pork 160°F, and poultry 165°F. Its specific egg-dish entry is 160°F, while relevant casserole entries are 165°F. This is a classification task before it is a measurement task: what precisely are you making?
Now state the question in a useful form. Does the thick region of this particular poultry portion meet the required internal endpoint? Have all relevant whole-bird locations been checked? Has the required rest actually elapsed after the steak reached its temperature? Each question suggests the evidence needed to answer it.
A vague question such as is dinner done mixes safety, texture, sauce consistency, and readiness to serve. Break it into parts. The thermometer can help with internal temperature. A fork can help assess the texture of a braise. The clock can track a required rest. None should be asked to answer every part alone.
Know what the instrument senses
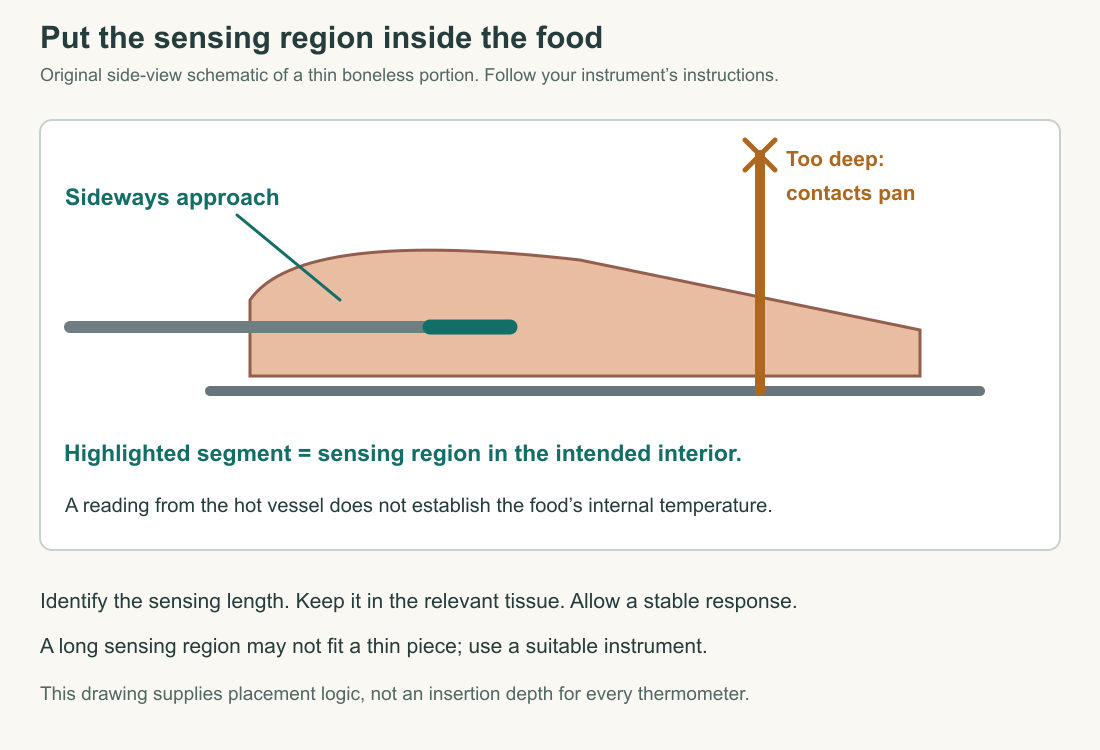
A probe does not necessarily sense only at its visible tip. Instrument designs differ in the length and location of their sensing region. USDA's Food Thermometers compares types and explains why some instruments fit thin foods better than others. Read your model's instructions for insertion depth, response, cleaning, and permitted use.
Consider a thin fish fillet and a probe that needs a long sensing region fully within the food. Inserting it downward can leave much of that region outside the intended tissue. A suitable sideways approach may fit; a different instrument may be needed. The limitation belongs to the combination of food geometry and sensing design.
Instant-read does not mean every instrument responds instantaneously. Hold the probe correctly for the time and stable-reading behavior the manufacturer specifies. A rapidly changing display immediately after insertion may reflect the instrument approaching the food's temperature rather than the food itself changing at that rate.
Likewise, a probe used to check near completion is not automatically safe to leave in an oven. Some instruments are designed for continuous exposure; others are not. The display housing, cable, and probe can have different limits. Follow the instructions for the entire device rather than assuming that a metal stem makes every attached part heatproof.
An infrared surface thermometer answers another question again. It does not measure through a crust into the center of a roast. FDA's Food Code, Annex 5 explicitly identifies infrared thermometers as inappropriate for internal cooking measurements. A useful surface reading remains a surface reading, however impressive the displayed precision.
Placement is a small piece of anatomy
The relevant internal location is not simply the easiest place to insert the probe. For a thick portion, identify the region that needs checking and avoid bone, large fat deposits, or an empty cavity. For thin food, choose an approach that keeps the sensing region within the intended center. Revisit the diagrams and cases from the ingredient chapters when needed.
Think of placement as a three-dimensional task. From above, a probe may appear to enter the center of a fillet while passing entirely through its thickness. From the side, you can more readily imagine the path through the flesh. The useful view is the one that helps you place the sensor, not the one that makes the photograph look tidy.
A whole bird requires several named locations because its regions differ. A tray of separate portions requires attention to separate pieces because one does not establish the condition of the others. A large or irregular roast may need several checks. The purpose is to address plausible unevenness, not to collect as many numbers as possible without a plan.
If two readings differ, first ask whether both were correctly placed and given time to stabilize. If one touched the vessel, discard it as evidence about the intended interior and take a valid reading. If both are valid, the difference may be real. Do not erase the lower reading merely because the higher one makes the decision easier.
Keep the food safely supported while measuring, with appropriate protection from hot vessels and steam. Prepare the route before lifting or turning a fragile portion. The measurement should fit into the cooking sequence as a deliberate action, not become a hurried interruption performed while balancing hot food awkwardly.
Check accuracy before relying on precision
A display with a decimal place can create an impression of certainty that the instrument does not warrant. Precision in the displayed digits and accuracy relative to the real temperature are different properties. An instrument can repeatedly display the same wrong number.
USDA describes checking a food thermometer with an ice-water mixture. The expected reference is 32°F, or 0°C, when the mixture and measurement are prepared correctly. Follow the complete procedure and your manufacturer's directions, keeping the sensing region in the mixture rather than against the container. Do not immerse parts that the device's instructions say must stay dry.
This check provides evidence at a reference condition. It does not prove flawless performance at every cooking temperature, nor does it repair a damaged probe by itself. If the result is outside the manufacturer's acceptable range, follow its adjustment, service, or replacement instructions before using the instrument for a safety decision.
The boiling-water alternative requires attention to atmospheric pressure and elevation. Water does not boil at exactly the same temperature in every location. For this course's optional equipment exercise, the manufacturer-approved ice-water method is the simpler starting point. Do not improvise a boiling check from a remembered sea-level number.
Record the date, procedure, observed value, and any adjustment. If an instrument has been dropped, damaged, or begins giving implausible readings, investigate rather than treating the last successful check as a permanent guarantee. A short record makes a change in performance easier to recognize.
Use uncertainty to improve the next action
Imagine a hypothetical thermometer that reads several degrees high in a correctly performed check. A cooking display just at the required endpoint may then represent food below it. The direction of the error matters. The sensible response is to resolve the instrument issue through its instructions or use another reliable suitable instrument, not to pretend the digits are exact.
Now imagine two sound instruments giving different results because they were placed in different regions. Adjusting one to agree with the other would be the wrong response. The disagreement may come from placement and real temperature variation. Recheck comparable locations and response conditions before deciding that a device needs calibration.
This distinction separates an instrument problem from a sampling problem. The former concerns the reading produced under known conditions. The latter concerns which part of the food you measured. Both can affect a cooking decision, but they require different corrections.
A third problem is recording. If a note says 165 without units, location, or timing, another person cannot reconstruct the evidence. A useful entry is concise but complete: the food, the location, the units, and whether the reading was stable. Add the relevant required rest when applicable.
You need not write a laboratory report every time you cook. During learning, a few careful records build habits that later become quick. The objective is to notice the conditions that make a measurement meaningful, so you can act reliably even when you no longer write each one down.
Rest is a step, not a prediction
After a food leaves active heat, temperature differences within it and between it and its surroundings continue to drive heat transfer. A warmer outer region can transfer heat inward while the food also loses heat to the environment. The center may rise further under some conditions; the amount is not a universal allowance to subtract from every recipe endpoint.
A thin fillet, a large roast, and eggs left in a heavy skillet have different shapes, stored heat, and surroundings. It would be unreasonable to assign them all the same automatic rise. The useful observation is that thermal history continues after the burner changes, not that every unfinished interior will necessarily finish itself.
For the whole-cut categories requiring a three-minute rest in the official guidance, first reach the stated internal temperature, then complete the required interval before cutting or eating. Treat the two conditions as a sequence. Removing meat below the stated endpoint and hoping the rest will supply the missing heat is a different procedure, which this course does not use as a shortcut.
Some published methods deliberately include an off-heat cooking stage before final verification. The skillet chicken in Chapter 4 is one example. Its final thermometer check and instructions for further cooking are essential. The existence of a planned off-heat stage does not make every improvised wait a validated substitute for that sequence.
A longer rest specified by a particular recipe can also affect serving and texture. Follow the complete method while keeping handling limits in view. Resting is not indefinite room-temperature storage, and a hot pan is not automatically a controlled holding appliance. The final stage deserves the same explicit planning as the active cooking stage.
Repair an unreliable instruction
Here is an original hypothetical instruction: cook the chicken until golden, remove it when the center looks white, and let it rest until the sides are ready. It supplies an attractive surface, a color cue, and an open-ended delay. It does not specify a reliable internal check or a useful serving schedule.
A better version would name a complete published method matching the actual cut and equipment, identify the relevant measurement locations, require the poultry endpoint, and include any source-specified rest after verification. It would also plan the accompaniments so their timing does not create an uncontrolled wait. The repair replaces missing decision criteria rather than merely adding more adjectives.
Here is another instruction: remove the roast at the minimum temperature and serve, because the thermometer says it is done. If this is a collagen-rich pot roast, that statement may omit the intended tenderness check. If the applicable safety category requires a rest, it omits that too. A correct number has been assigned more authority than it can carry.
Finally, consider: the fish flakes at one edge, so every portion on the sheet is ready. The observation concerns one place on one piece. It cannot establish the internal state of all portions. The repair is to inspect and measure the relevant pieces properly, allowing their completion times to differ.
These examples show how to read recipes actively. Ask which observations trigger action, which measurements establish requirements, and which intervals must occur. A recipe can be concise and still provide those decisions. Lengthy description without usable criteria does not make an instruction more reliable.
Practice the sequence without buying more food
The equipment exercise can be completed without cooking meat. Read your thermometer's instructions, identify its sensing region, and perform a manufacturer-approved accuracy check if suitable. Draw the insertion path for a thin fillet, a thick boneless portion, and a whole bird. Explain what could invalidate each reading.
Then use supplied observations to make decisions. A valid below-endpoint reading calls for further appropriate cooking and rechecking. A reading taken against a hot pan calls for a new correctly placed measurement. A completed temperature requirement with an unfinished required rest calls for completing the rest. These are distinct actions triggered by distinct evidence.
For practical cooking later, carry the sequence into one familiar recipe rather than starting an elaborate new dish. Classify the food, identify the measurement locations, check the instrument's suitability, follow the method, measure correctly, and complete the applicable rest. The order reduces the number of decisions you must improvise at the last moment.
Finally, describe the culinary result separately. A safe preparation can still be too firm, too dry, or poorly browned for your preference. Those observations guide the next quality improvement. Keeping them distinct preserves both ambitions: reliable preparation and food worth eating.
Application
Equipment route: use your thermometer's instructions and the linked USDA reference to perform a suitable accuracy check. Record method, result, permitted adjustment if needed, sensing area, and whether the device may remain in the cooking environment. If you do not own a thermometer, complete the supplied route instead.
Supplied route: evaluate these hypothetical records:
- Fish: 145°F, probe passed through the portion and touched the hot sheet.
- Chicken: 165°F, correct location, display still changing when removed.
- Whole-cut pork: 145°F, correctly placed stable reading, sliced immediately despite a required three-minute rest.
- Braised chuck: applicable safety conditions completed, texture still resistant.
Model interpretation: the first needs a correctly placed internal reading; the second needs proper response time and a stable reading; the third omitted a required stage; the fourth may need further appropriate cooking for its quality goal. None is resolved by repeating the number more confidently.
Transfer task: rewrite one unreliable cooking instruction from the chapter into a brief decision sequence. Include the actual food category, source method, measurement location, endpoint, applicable rest, and separate quality observation.