A knife, a board, and repeatable cuts
Place a thick carrot coin beside a very thin one. They came from the same carrot, but they are now different cooking problems. The thin piece has a shorter distance between its surface and center. If you want both pieces to reach a similar texture in the same pan, their different dimensions matter. Cutting is the first stage of choosing how an ingredient will cook.
This gives knife practice a purpose beyond neatness. You are trying to make pieces suited to a particular use, with enough consistency that the next step is manageable. A pile of perfectly shaped cubes is unnecessary for many dishes. A pile containing huge chunks and tiny fragments can be troublesome even in an informal meal.
Speed comes later. The first signs of progress are that the board stays still, the ingredient remains stable, your hands have deliberate roles, and the pieces resemble the size you intended. If concentrating on speed disrupts any of those conditions, slow down. Cooking dinner does not require a performance with a blade.
Begin with a stable arrangement
Read the course's food-safety chapter before the practical work. Wash hands and prepare a clean board, knife, and suitable washed produce. Work with good visibility and enough clear space that the knife's path does not run into another object. Keep the knife visible when you set it down. Do not attempt the exercise while distracted, impaired, or unable to control the tool comfortably.
The board must resist sliding. Check it with gentle pressure before beginning; stop and correct movement if it occurs during cutting. Choose a board intended for food preparation and appropriate for knives. Very hard surfaces such as glass or ceramic are poor choices for preserving an edge. Utah State Extension's knife handout discusses board materials and blade care. Knife Skills
A knife should fit the task and feel controllable in your hand. A very small blade can make a large ingredient awkward; an unnecessarily heavy or long blade may feel difficult to guide. Check that the handle is secure and dry. An edge that repeatedly slips or demands excessive force needs attention. Follow the manufacturer's maintenance instructions or seek competent sharpening help rather than compensate by pushing harder.
The ingredient needs stability too. Roundness is often the first problem to solve. For an appropriate vegetable, establishing a flat face and placing that face down creates a more dependable base for subsequent cuts. If making the first cut itself feels beyond your control, choose a smaller or prepared ingredient and get a practical demonstration. A hard squash is not a useful first test of confidence.
Two hands, two jobs
The knife hand controls the tool. The other hand controls the ingredient. Keep the supporting fingertips out of the blade's path, with fingers curled back and the thumb protected rather than projecting forward. A grip sometimes called a claw helps establish that separation, but the name is not enough: you must be able to see where the edge will travel and maintain control as the ingredient changes shape.
Use a secure grip on the knife handle. A comfortable pinch near the handle on the sides of a suitable chef's blade is a common technique, but hand size and knife design vary. Do not grip an exposed cutting edge or adopt a position you cannot maintain steadily. For someone learning entirely from text, a competent in-person demonstration is especially valuable. The geometric illustrations here explain the cuts; they cannot verify your hands.
Begin with single deliberate movements. After a cut, stop if needed, reposition the ingredient with the blade safely at rest, and make the next cut. You are allowed to separate actions that an experienced cook performs continuously. That separation is useful while you learn which movements belong together.
Avoid placing the supporting hand ahead of a horizontal blade. The onion method below does not require the optional horizontal cuts sometimes shown in demonstrations. You can make useful onion pieces through a simpler sequence. If a piece becomes too small to hold safely, leave a larger end or set the tool down and choose another method. Using every last fragment is not the highest priority.
If a knife falls, step away and let it fall. Do not try to catch it. Once it is safely at rest, retrieve it carefully and inspect it before use. This is one reason to keep the work area and floor clear and other people away from the cutting zone.
Think in thickness, then shape
For cooking, thickness is often more useful than a prestigious name for a cut. A slice has two broad faces separated by its thickness. A stick has thickness in two directions. A cube has roughly similar dimensions in three directions. Different dishes require different results, but these shapes give you a way to describe and compare what you have made.
Imagine a rectangular piece cut into slabs, the slabs into sticks, and the sticks across into smaller pieces. Each stage establishes one dimension. If the slabs vary greatly in thickness, the later cubes will inherit that variation. Repeated cuts cannot repair a dimension you have already made inconsistent; you must change the initial spacing or deliberately recut larger pieces.
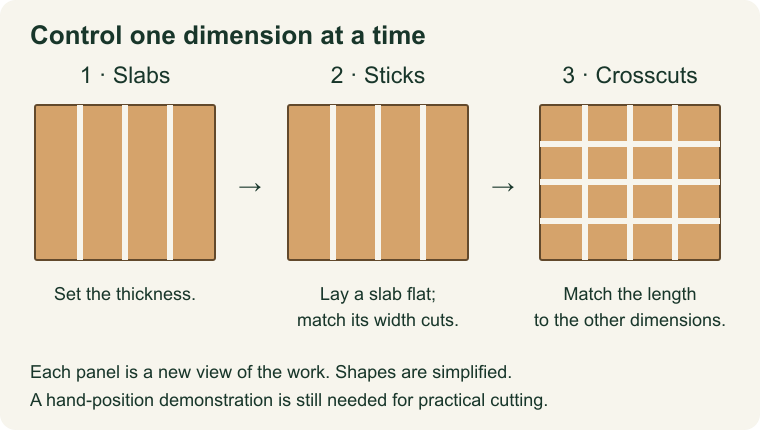
Formal culinary names can specify dimensions, but the immediate goal is to communicate what the recipe needs. If a recipe asks for an approximately one-centimeter dice, use a ruler on the first few pieces away from the active blade to establish a visual reference. You do not need to measure each piece while cooking. You need to learn what that instruction looks like in your kitchen.
Uniformity has a cost in trimming and time. Squaring off a carrot for exact cubes produces offcuts; casual half-moons may suit the dish with less work. Those are two different design choices. Practice a precise cut when precision is the skill being learned, then choose a practical cut for dinner when the dish allows it. Save suitable clean offcuts for an appropriate promptly prepared or safely stored use rather than force them into the same cooking batch regardless of size.
A carrot exercise
Choose a modest carrot that is comfortable to handle. Rinse it under running water, remove damaged portions and the ends as appropriate, and peel if the chosen preparation calls for it. Work with a manageable section rather than a long piece you cannot stabilize. If needed, obtain a flat base with a controlled cut, then place that face down.
For simple half-moons, a lengthwise half placed flat-side down provides a stable starting form. Make several crosswise slices of similar thickness with the supporting fingers protected. Do only a few, then stop and compare. Is the blade traveling at a consistent angle? Are some slices wedges because the spacing changes from one side to the other? Is the vegetable moving when you apply pressure?
These observations lead to different corrections. A moving ingredient calls for a stability correction. Consistent stability with uneven spacing calls for slower, more deliberate positioning. A knife that fails to pass through comfortably calls for checking the tool and technique. “Try harder” gives none of those problems an adequate diagnosis.
To explore a dice, use a stable manageable piece and the slab-to-stick-to-crosscut sequence. Work with one slab at a time if stacking makes it unstable. Compare the resulting pieces against a small sample you consider suitable. The exercise ends when you can identify the main variation and state how to reduce it. It does not end when you have cut the largest possible quantity.
Do not put your face close to the blade to inspect a cut while moving it. Set the knife down first, move a sample to a clear area, and look. Separating inspection from action protects attention and makes it easier to notice what the pieces actually show.
An onion without unnecessary complexity
An onion has layers, so the rectangular-block model needs adjustment. The layers already supply divisions through much of the ingredient. Begin with a sound onion of manageable size, remove the papery exterior, and create stable halves using a controlled cut from the stem side toward the root end. Place a half cut-side down. If the initial halving is difficult, use a smaller onion or seek a practical demonstration.
For a basic chop, you can make downward lengthwise cuts, keeping fingers and thumb clear and leaving enough at the root end to help the half stay together. Then cut across those divisions with deliberate downward movements to release pieces. Keep the remaining piece stable and stop before the small end becomes difficult to control. Discard the root section appropriately.
The exact pieces will vary because onion layers curve and change size. That variation is not evidence that the method failed. Judge whether the pieces suit the recipe. For a preparation that needs very small pieces, additional careful chopping of a stable gathered portion may be appropriate. Do not pursue tiny dimensions merely because a demonstration made them look impressive.
An alternative is to cut stable onion halves into slices for a dish that wants slices. Choosing the right shape avoids work. You should be able to answer why you are chopping rather than slicing. “The recipe needs small pieces distributed through a sauce” is a reason; “chopping seems more professional” does not describe a culinary purpose.
Read the pile you produced
Spread a small sample on a plate and separate it mentally into the intended size, noticeably larger pieces, and noticeably smaller ones. If most pieces are close to the target, a few irregular edges may not matter for the dish. If the sample contains several distinct sizes, consider whether to recut the large pieces or reserve different sizes for different uses.
This is quality control before heat makes correction harder. Once small pieces are overcooked, adding larger ones later will not restore their original texture. You can sometimes manage varied sizes by adding them at different times, but that introduces another timing decision. For a beginner, more consistent preparation often makes the next stage simpler.
Consistency is also useful when comparing cooking methods. If one pan contains thin slices and the other contains thick chunks, a difference in the result cannot be assigned to heat alone. Cutting has changed the experiment. The Heat, Flavor, and Texture course will use this idea when comparing otherwise similar batches.
Photographing a sample beside a size reference can help you assess a later attempt. Label the target and the observed variation. Do not photograph while holding the knife. The point of the image is to make a comparison possible, not to interrupt controlled work for a dramatic shot.
End the task deliberately
Transfer prepared ingredients with a suitable scraper or utensil, keeping hands away from the edge. Do not use a fingertip to push food along a cutting edge. Clear scraps, clean the knife carefully, dry it, and store it with its edge protected. A blade left loosely in a drawer creates a problem for the next person reaching into it.
Your board, work surface, and hands need the cleaning appropriate to what they touched. If the next task involves a different contamination risk, follow the separation rules in chapter five. Do not let the satisfying completion of the cuts obscure the transition to the next ingredient.
The achievement is modest and important: you can produce a useful shape, explain why it suits the food, and notice when control or consistency begins to fail. That gives the cook at the stove a more predictable starting point.
Application
After reading chapter five, prepare a small sample of carrot half-moons or dice and a small amount of chopped onion. Work slowly, stopping whenever stability or hand position feels uncertain. Record the intended size, one variation, and a specific correction. Use prepared ingredients or a paper geometry exercise if practical cutting is unsuitable.
Check: A learner produces very neat small cubes but also several large end pieces, then puts everything into a pan together. What should they consider before cooking?
Model interpretation: The sample contains different thicknesses that may cook differently. Recut suitable large pieces safely, choose a method that tolerates the variation, or keep different sizes for different uses. Neatness in part of the pile does not establish consistency across the whole batch. Speed and minimal waste should not override safe control.
Teaching limit: Reading and a schematic cannot establish practical competence. Use a competent hands-on demonstration to learn and check grip and movement; stop any exercise in which you cannot maintain safe control.